
New generation web platform for Car Hauling Dispatchers to manage their fleet and loads.
The new web application platform for Dispatchers helps auto transport companies to manage their fleet in the most efficient way and with minimum effort. The simplest process helps to get started within minutes. Flexible licensing. Easy, quick, sufficient.
To ensure the highest possible return on investment, we’re offering new pricing and prediction structure for the GOFORIT web app, based on a cost-per-driver (CPD) model. You will only be charged for the really needed number of drivers for each particular month. No extra or hidden fees for the number of loads, the number of delivered cars, etc. It will be unlimited for all our users. We’re excited for you to take advantage of this product to move your fleet management service to a new level. To get started, simply sign up for an account (it is free for the first months) at http://dispatch.goforitapp.com.
Step-by-step tutorial of how to use GOFORIT for Dispatchers and a list of the main features.
Where to start
To start using the application you will need to register as a dispatcher on this page: dispatch.goforitapp.com. After registration, you can use our app for free for one month before any additional charges apply! The web app offers you an endless amount of possibilities with no limits on functionality. The main value is to help you manage your loads and transporters, so in the beginning please send invites to your drivers. This can be done in the Transporters section (please check the instruction below). To be able to add Transporters in the Dispatcher web app – all your transporters have to be already registered in the GOFORIT mobile app as transporters. You may send them this link to download a mobile app if needed:
Transporter app registration is quick and easy! After your drivers have created transporter profile in the mobile app, all they have to do is accept your invitation. After that’s done, they’ll automatically appear in your transporters page. All you have to do is to activate them by sliding bar to the green (see picture).
Now you can create first load and assign it to the activated transporter. Each time you assign a load to your transporters – he/she will see the load in the Opportunity and load invite page (in the mobile app). After driver accepts the load, the status of the load will change from New to Assigned.
Your driver can now pick up the assigned load. Driver can easily navigate to the pickup or delivery addresses, do thorough inspection of the vehicle, get signature from shipper and receiver. Once your driver picks up the load you can track on the map in real time. No more guessing where the driver is and no need to call around for updates.
After driver delivers load it automatically goes to your history page from where you can download the BOL, send it to customer for payment or check your drivers performance by applying date filters.
The Home Page and the Widgets
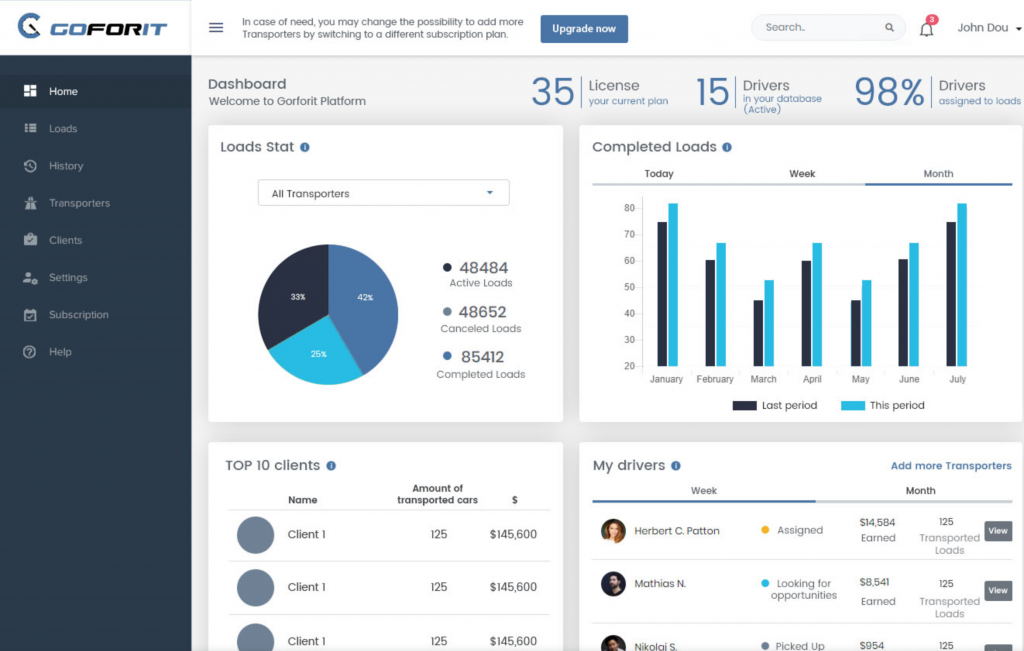
On top of the screen, you see the licensed bar with 3 indicators:
1) The number of purchased licenses. This indicates number of transporters you can have under current plan. For the first month of use, this number will be 0 (as this is a trial period) and you can add and dispatch as many transporters as you wish. After the first month, this number will indicate the number of licenses that you have actually purchased.
2) Active Drivers. This reflects number of drivers currently in active status.
3) Drivers assigned to loads indicates percentage of your drivers who are assigned to loads. Basically this shows you what is your utilization rate of the product.
There are 4 widgets on the home page. The first widget shows the load stats about how many loads are currently active, delivered or delayed. You can filter this information by selecting specific driver.
The second widget shows completed loads by week and compares it to the last period. You can view weekly or monthly reports. The yearly report shows your gross earnings by months for past year.
The third widget shows the top 10 clients which represent the customers where your drivers delivered cars. This helps you have understanding of who is your top customer. In the fourth widget, you see the list of your drivers and their performance in current or previous week/month. You can add dispatcher fee in the fee section and it will help you understand how much you earn each week or month.
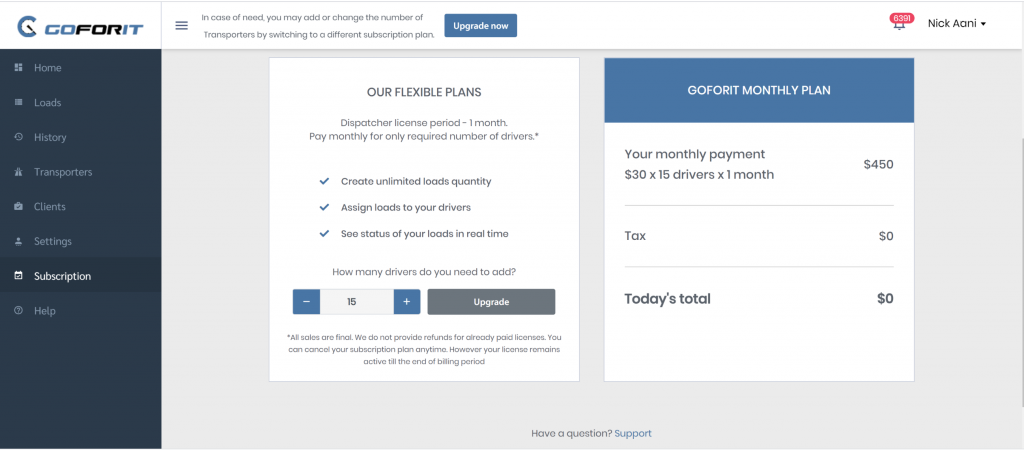
How to purchase a license
For the first month, you don’t need to purchase a license – it is free for an unlimited number of drivers. After trial period expires you will be asked to purchase license to continue using service. You can do so but clicking Upgrade Now.
In the Subscription page you see how many active drivers you currently have. By pressing on “-” or “+” you can downgrade or upgrade subscription plan. On the right side, you see total monthly payment and today’s total which reflects any changes done to the current subscription plan. Pay attention that if you are making changes in the middle of the current billing period, the actual change will happen after the billing month is over (for license decrease or cancellation). For example, if you cancel a subscription for one driver and it is 10 days before the next billing date then the driver will still be active for the next 10 days.
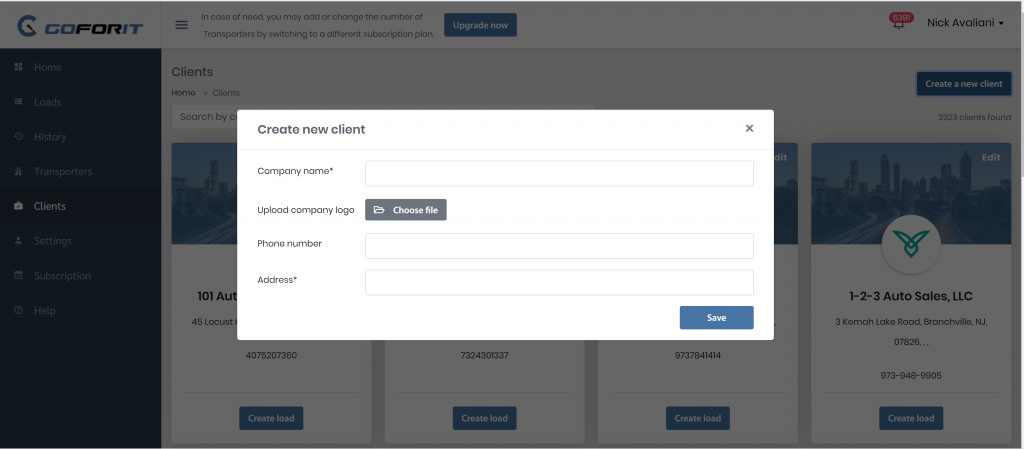
How to add Clients
In the Clients section, you see clients who are in the GOFORIT database. These clients list is created based on GOFORIT transporters deliveries or pickups, when they create loads they also create profiles of dealerships, brokers, car yards, auctions, etc. You can start creating the client by pressing on the “Create New Client” button. Fill out all necessary information and press save. Below the button, you see how many clients are in the database. You can start creating load for each client simply pressing on “Create Load” which will open blank load page simultaneously pasting this client’s info in the pickup field.
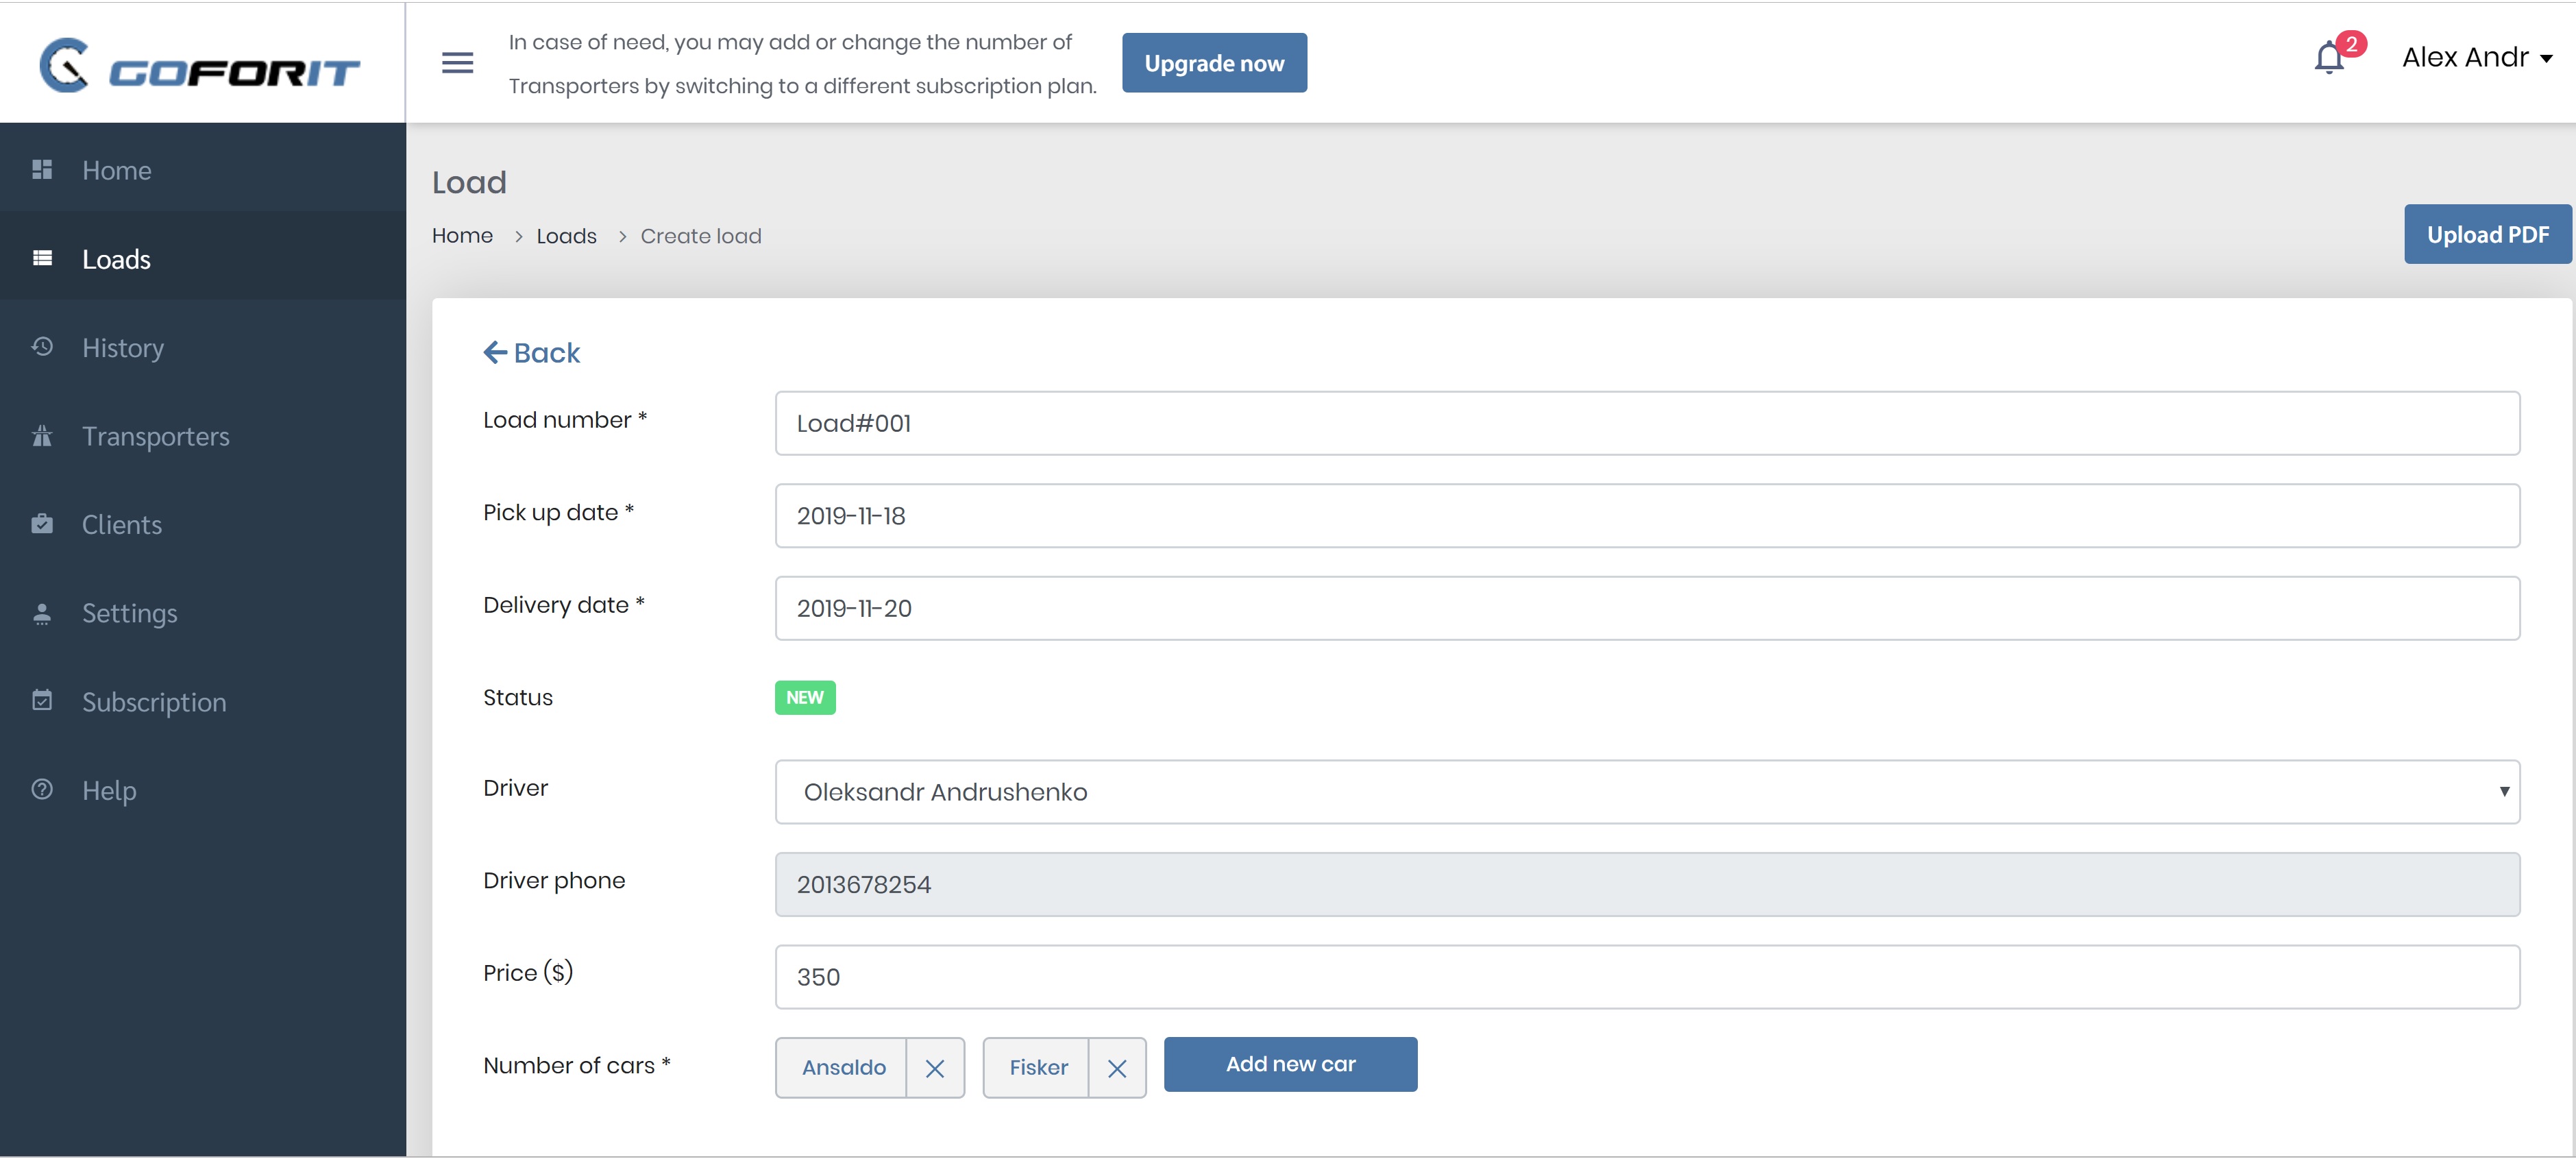
How to create a Load
On the right side of the Loads tab find “Create Load”. By clicking on it you open a blank load page where:
1. You can fill out information manually or copy it from another website and paste it in the appropriate fields. Please make sure you’ve added cars in the number of cars field by pressing the “Add new car” button. Don’t forget to press the “Submit” button after each car. You can add up to 11 cars in 1 load.
2. Also, you can upload loads from ACV Auctions, Central Dispatch, Ready Logistics, CarsArrive, Metroloads. Download PDF file from central dispatch or ACV auctions load board and simply upload it in your load page by clicking on “Upload PDF“. The information will be automatically pasted from the PDF to the load fields. You can review to make sure all info were accurately imported and assign the load to the driver.
The Load page consists of three sections: Search, Active Loads and Map.
If you already have created number of loads, you can search for any load in the Active loads section. Just type load ID, vehicle or customer info.
In the Active load section, you see the list of loads that you can edit or delete. Press the Edit icon on your right side and you can change any information in the load. Pickup/Delivery dates, Add additional vehicles, change vehicle info, reassign to the new driver, etc.
Map. In the third section, you see drivers and their locations. The location is updated every minute and by clicking on the Load Icon you can pull all needed information for the load: How many cars are in the load, who is driver assigned to this load, what is the distance, pick up and delivery addresses and Load ID.
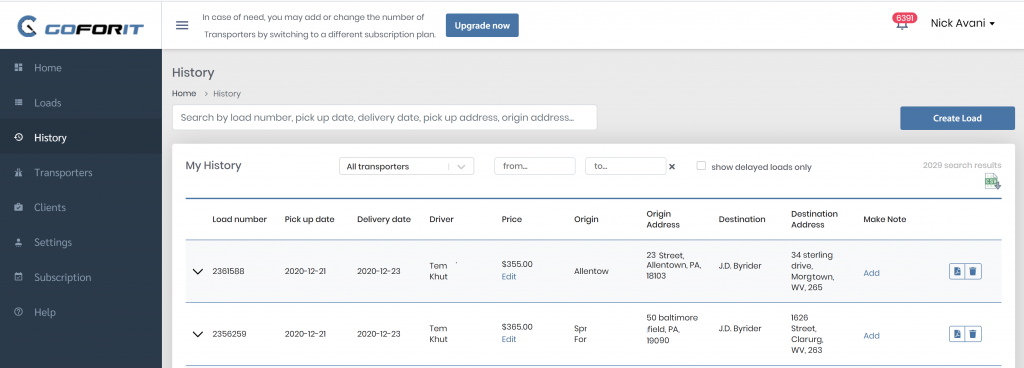
How to use the History page?
History page shows all your delivered loads. You can search for loads by load id, Pickup or delivery date and address. You can download PDF of each load instantly to your computer by pressing “Save as PDF” button.
How to add/delete your Transporters?
On the Transporters page, you see the list of drivers you have invited or is already connected to your company. In the search field, you can lookup transporters in our database. Once you find driver you can send the invite. In order driver to be connected to you, he/she should open GOFORIT Mobile App and accept the invite. If a driver, who starts working with you, is not present in the database you can ask him/her to create a transporter account in GOFORIT mobile app. After the transporter successfully created an account in GOFORIT mobile app, you can search for him again, and send an invite to connect to your company.
To Deactivate the transporter simply search for this transporter and change the green Active status to Not Active. In this case he will be removed from your license but still be in the “short list”. You can activate him again whenever you want (if your license capacity allows you to do so). When the transporter is Deactivated you will be able to delete him if you want. He will be removed from the list of your transporters until you’ll add him again.
How to use goforit map to optimize routes and dispatch owner-operators efficiently?
Goforit App dispatchers use a map feature to plan routes for drivers, assign jobs, and calculate mileage, tolls, and gross revenue. The best way to explain to your owner-operator what the best options are.
How the billing period and the payments are working?
Validity for Dispatcher license – 1 month. It is dynamically recalculated after each purchase/upgrade.
For example, you purchased the license for 10 transporters on 07/20/2019. You paid 30×10 = $300. Your next payment scheduled for 8/20/2019, and should be another $300. Your billing period, in this case, is from 07/20/2019 – 08/20/2019).
Let’s imagine the situation that on 08/10/2019 you’ve decided to upgrade to 11 Transporters (to add 1 more). Now the new billing period will be from 08/10/2019 till 09/10/2019. You need to pay for this one license that you want to add plus the difference between the monthly payment for 10 Transporters that you did before minus the amount that has already been paid and not used (in this case from 8/20 till 09/10). So the payment would be: $30 + ($300 – $100) = $230.
Based on a new billing period, the next scheduled payment will be on 09/10/2019 and it will be $330.