
Find Shipments and Inspect Vehicles. Everything in one app
Are you looking for a load that is the most suitable for you? Are you a hotshot car hauler or working for the company? Use GOFORIT App to check available loads near you, Send offers, Accept rates, or negotiate them. Contact dealers or brokers directly from the app. Simply switch on/off your availability on the map, so dealers and brokers will/will not see where you currently are to send you loads. Set your searching criteria, such as minimum $ per mile per car, number of cars you can take, are you willing to take INOPs or not, Do you have an enclosed trailer? Once the load is booked, you will instantly get all the required information; then, you can contact pickup and destination parties, inspect the vehicle, and obtain electronic proof of pickup or delivery. Our inspection diagram is the easiest to use and very helpful whether you are transporting old vehicles without thorough inspection or expensive vehicles when required to mark damages by sizes and exact location. If you are an owner-operator working for your own company GOFORIT App is an absolutely great tool to track payments; simply mark paid loads as green and unpaid as red; the GOFORIT history page provides statistics on how much you make as a driver or owner-operator. In the Goforit app car hauler helps another car hauler. Different car haulers can use the dealer profiles created in the app.
We work hard to make the process of inspection as much easy as it can be. Please see these guides to receive the answers and to learn how to succeed with GOFORIT.
Register
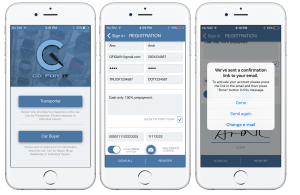
- When you open the application for the first time, please chose the “Transporter” mode. This mode will be saved for the future sessions.
- Press “Register” link.
- Fill the registration form.
- Fill the “Terms of Transportation” field if you want to add additional terms of cooperation with you.
- Press “Show on Print Form” if you want to add this Terms to the bill of ladings.
- Add “Bank Account number” and “Routing number” to be able to receive Bonuses and money from Car Buyers if they’ll buy your inspection.
- Accept Terms.
- Sign (your sign will be added to the future bills of lading) and press “Register”.
- Check your email for the activation link and press it.
- Press “Done” button in the message.
- If you’ve been pressed the confirmation link before you’ve press “Done” button, you will be forwarded to the Home Page.
Inspection: Car Info
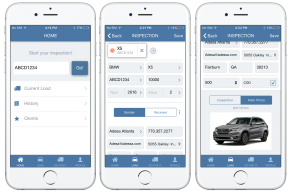
- Enter a VIN number on the Home page to add a new car to your Load and press “GO”.
- The Inspection page will be opened and a new car will be added to your Load.
- Enter basic information about the car, like: Make, Model, Year, Mileage, Amount of Keys.
- Add a new Sender (the company or Person who sending the cars) and fulfill the information about him or chose existing Sender from the list.
- Enter amount of $ Hauling (Hauling and COD will be on the bill of lading).
- Add a new Receiver (the company or Person to whom you are delivering this car) and fulfill the information about him or chose existing Receiver from the list.
- Add main photo: Press “Main Photo” button, press on photo place and use your camera to make a photo.
- Add additional notes about the car condition (this note will be showed near the inspected car on the bill of lading).
- Fill in Damage Schema.
- You can add a new car to your Load again from the Home page, or from the Load page, or pressing “+” button on the top on Inspection page.
Inspection: Damage Schema

- Press the Schema picture.
- Press the car part that has damage.
- If the part has sub components chose sub component that has damage, add the size of the damage and add the picture. If there are more damages, simply chose additional types of the damage and add photos.
- Press Save button and choose other car part to add more damages.
- The system automatically will paint the schema with the different colors, depends on the size of the damage.
- Add all damages to the schema. This schema with all the damages will be on the bill of lading.
- Press “Load” button to review your load, or chose other car on the top of the Inspection Page.
After your car was moved to the history, you will be able to review and print all damages with photos that you made. All photos will hold Sender’s address, time and date when the photo was tagged to the damage.
Client’s Sign-Off and changing the car status
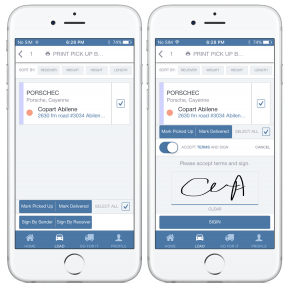
The car can have three different statuses: New (Red), Picked Up (Yellow), and Delivered (moved to History). New cars – it’s cars that you just created in your Load. Picked Up – the cars that you already have been inspected and currently you are delivering them. Delivered – means that these cars have been delivered to Receiver. Cars that have been delivered will be moved from Current Load to the History automatically.
- Press “Load” button.
- Choose (mark checkbox) the cars that you want your client (Receiver or Sender) to sign.
- Press “Sign by Sender”. The Sender should accept terms and sign. Then press “Sign”.
- The car will be marked as Picked Up (Yellow). Sender and Transporter will receive PDF file with Transportation Documents.
- You also can move the cars to Picked Up status by pressing “Mark Picked Up” button (in case the Sender can’t sign).
- You can print selected cars by pressing “Print” button on the top of the screen.
- The same for Receiver. Press “Sign by Receiver” or “Mark Delivered” to mark these cars as delivered and move them from Load to History.
GOFORIT Inspection Page
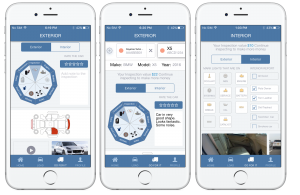
- When you’ve created a new car in the Load press “GOFORIT” button in the bottom panel.
- Each section of Polygon is a separate type of information that you can provide about the car.
- Press on segment that you want to use and add Photo or Video materials also press check-boxes to identify damages easily.
- When the information to segment was added the picture on the segment become colored and will be shown to the potential buyers.
- Fill in different segments with the maximum of information to increase the numbers of potential purchases.
- Press Interior button to add the information about the interior.
- Add Photo and Video about the interior and use check-boxes to identify interior condition.
- Check the dashboard lights to identify what you see on the car’s dashboard.
- Get back to your load and continue to work with the regular inspection page.
GOFORIT inspection page is needed to provide more detailed and wide report about the car. As car transporter, you don’t need to fill the information on this page to proceed with your day-to-day process. The information on this page won’t appear in the bill of lading. However the information on this page is the most valuable and means the most for Car Buyers. The amount of your сommission directly depends on the quality and fullness of your inspection on this page. It’s very easy and strait forward. After you’ve added the information to this page, it will be automatically showed on the market (to potential buyers) as soon as you’ll move the car to Delivered state. Please note, that you won’t be able to add GOFORIT information to specific car if you moved this car to Delivered state.
History Page
 History page is needed to be able to review the details about your previous inspections.
- Press History button on Home screen.
- Not Paid/Paid signs show was the COD paid or not.
- Browse the history to find needed car or use Search option to do so.
- Press on the car that you want to review.
- Check the details on car inspection page: Car details, Delivery date, Sender’s and Receiver’s info, COD,…
- You can press Goforit button on the top right corner to check detailed GOFORIT inspection (if you did it).
- Press on Inspection Schema to review entered damages.
- Press on particular photos to check the details: when and where the photo was made (location will be the same as the sender’s address).